Web UI Initial Configuration
Regardless of the installation method you chose, you will need to go through the initial configuration wizard before you may start using Zenarmor®.
To start Zenarmor Initial Configuration Wizard, you may follow the next steps:
- Log in to your OPNsense web interface
- Click Zenarmor from the left menu
- Click on the Dashboard sub-menu to open the configuration wizard
1. Welcome
On the Welcome page of the Zenarmor Initial Configuration Wizard, follow the next steps:
-
Accept the Terms of Service and Privacy Policy by clicking on the checkbox.
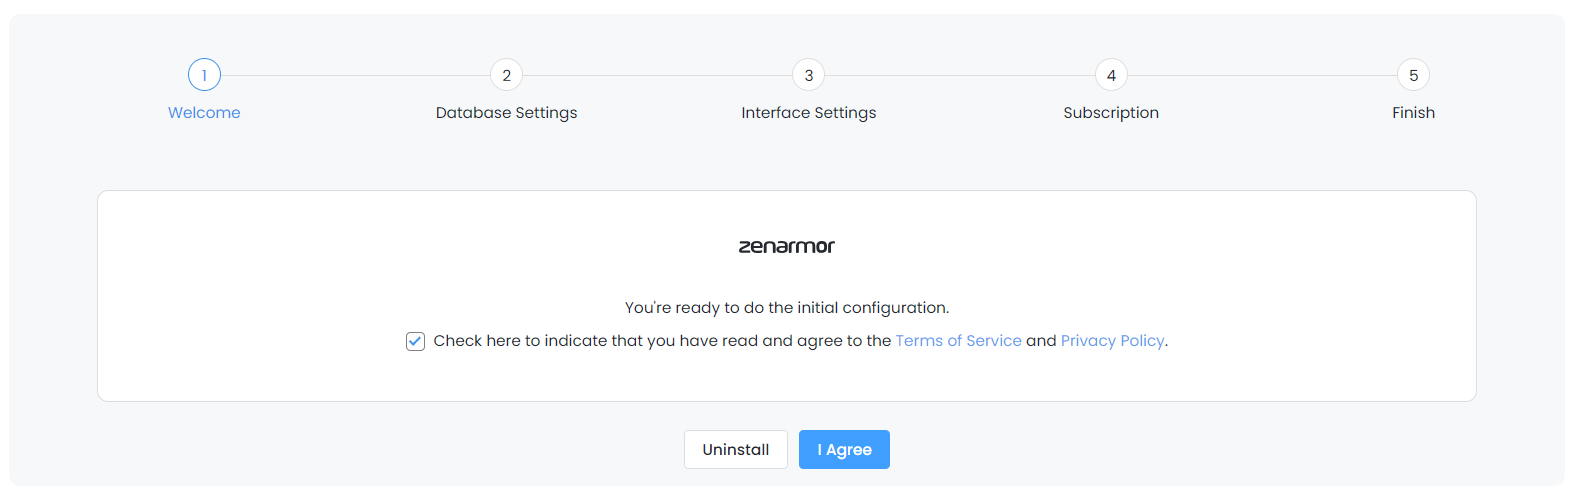
Figure 1. Accepting Zenarmor Terms of Service on Initial Configuration Wizard
-
Click the I Agree button to continue to the Hardware Check section.
2. Hardware Check & Reporting Database
Your hardware will be analyzed to ensure it meets the minimum requirements. You will receive one of the following responses: compatible hardware, low-end hardware, incompatible hardware. The setup will not continue if you have incompatible hardware.
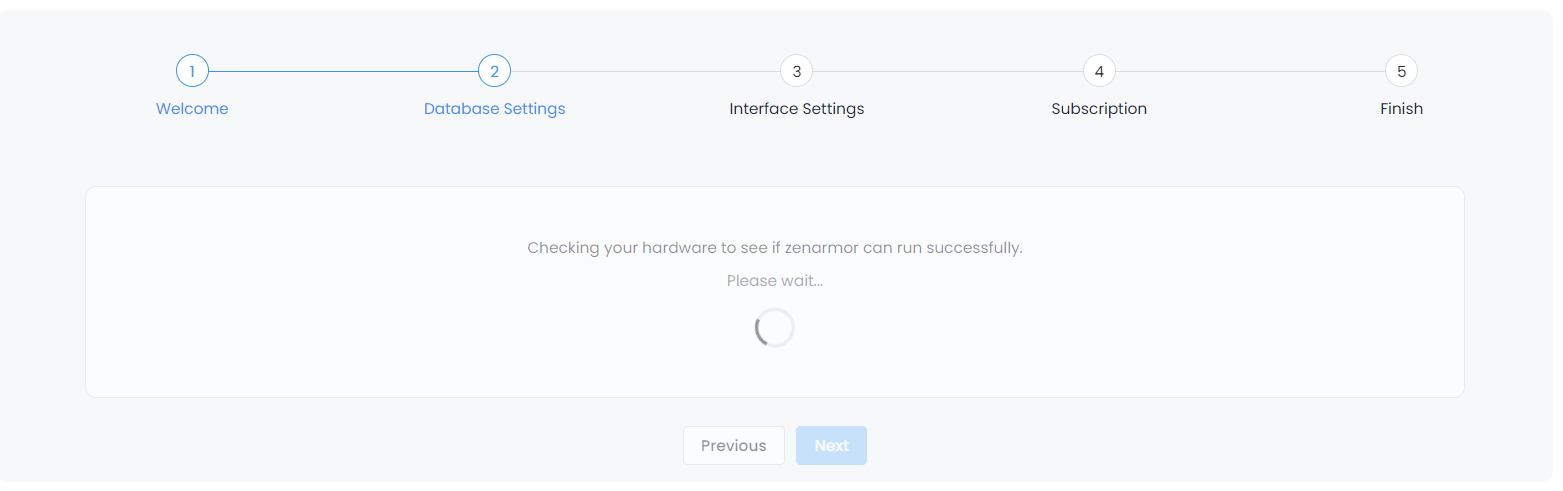
Figure 2. Checking hardware
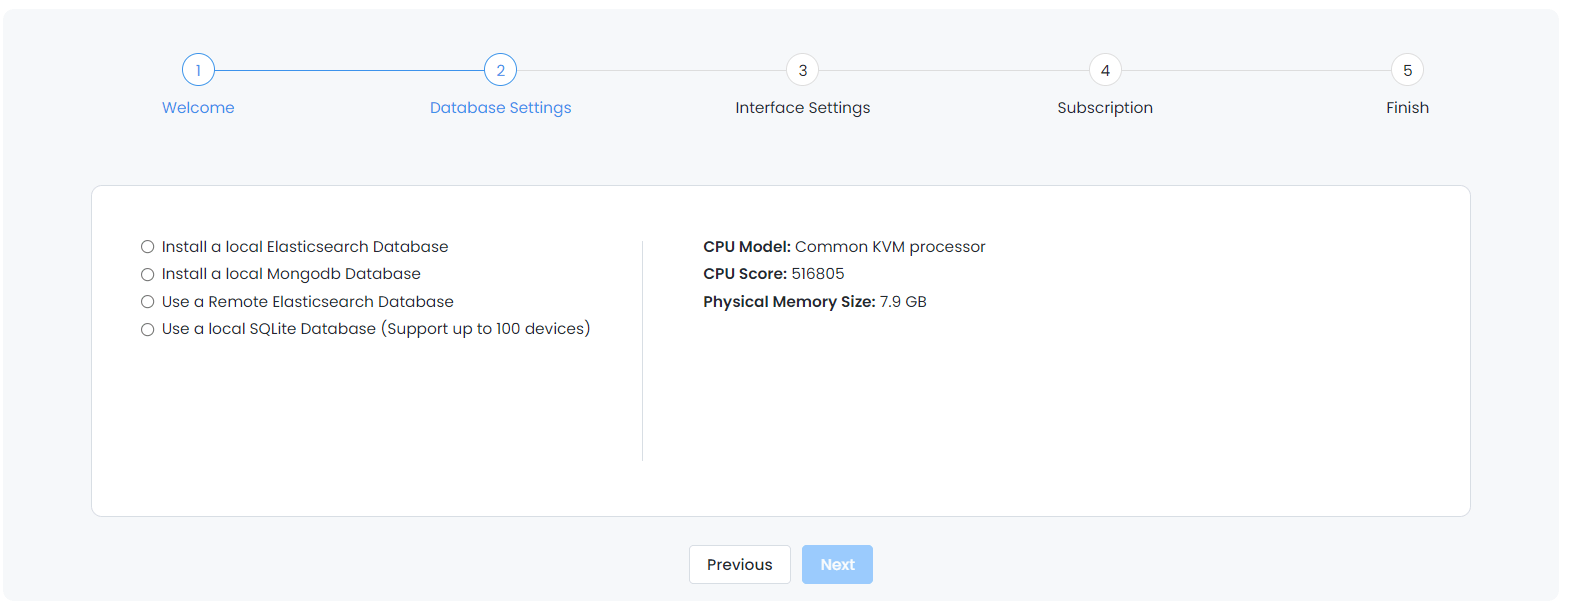
Figure 3. Compatible hardware
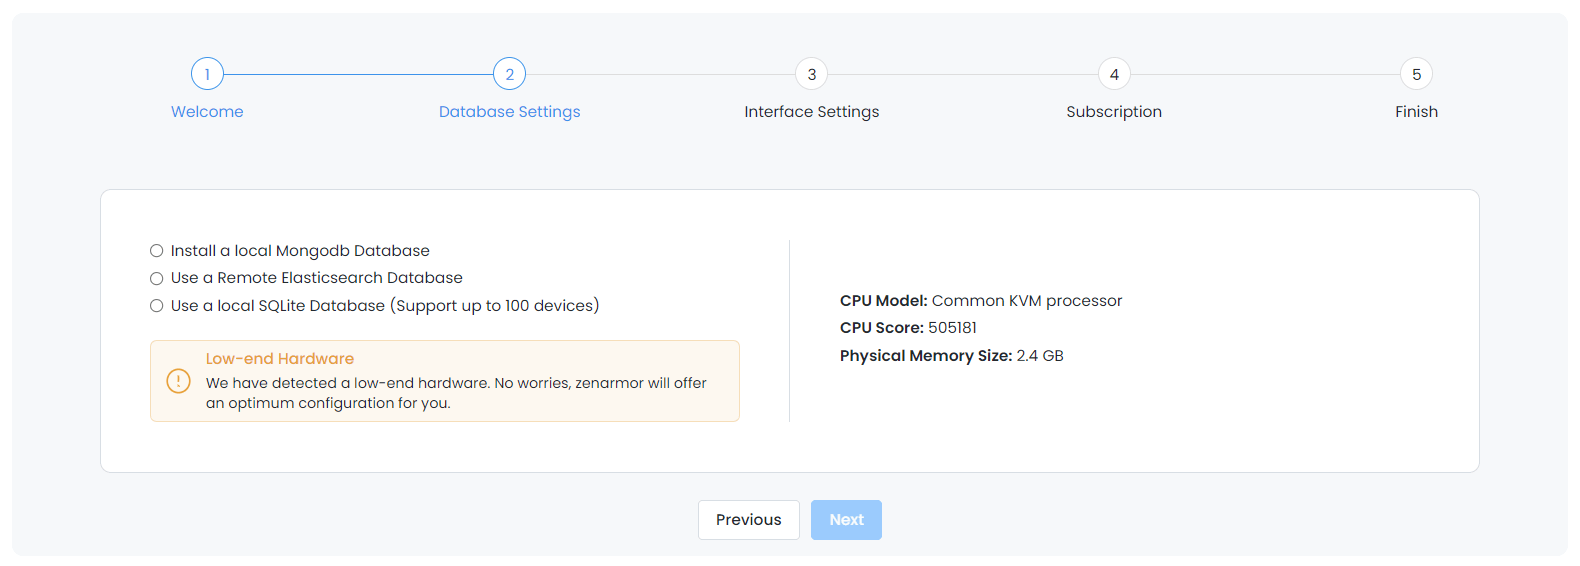
Figure 4. Low-end hardware
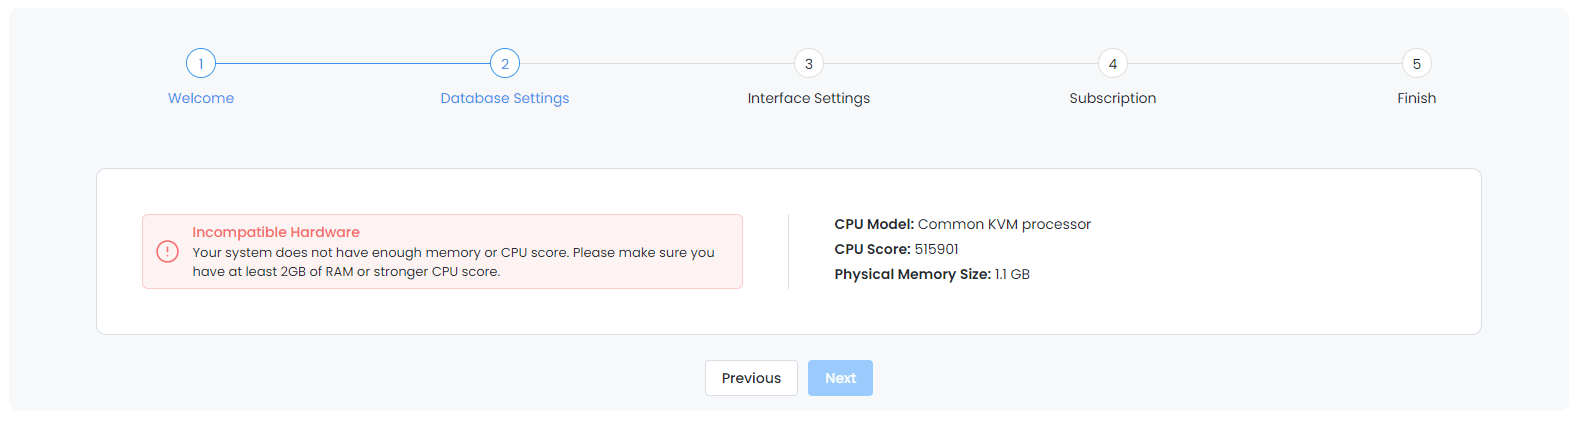
Figure 5. Incompatible hardware
After the wizard completes the hardware analysis, select the database you wish to use for reporting. High-end systems will have 4 options, while low-end systems only have 3 options except Local ElasticSearch DB.
Zenarmor offers the following Database deployment options:
- Local ElasticSearch DB
- Remote ElasticSearch DB
- SQLite Database
Starting in September 2025, support for the MongoDB database backend will be discontinued. After this date, new installations will no longer offer the option to use MongoDB.
If you wish to use a remote ElasticSearch database, you must choose it now since you cannot change your reporting database type after the initial configuration wizard has been completed.
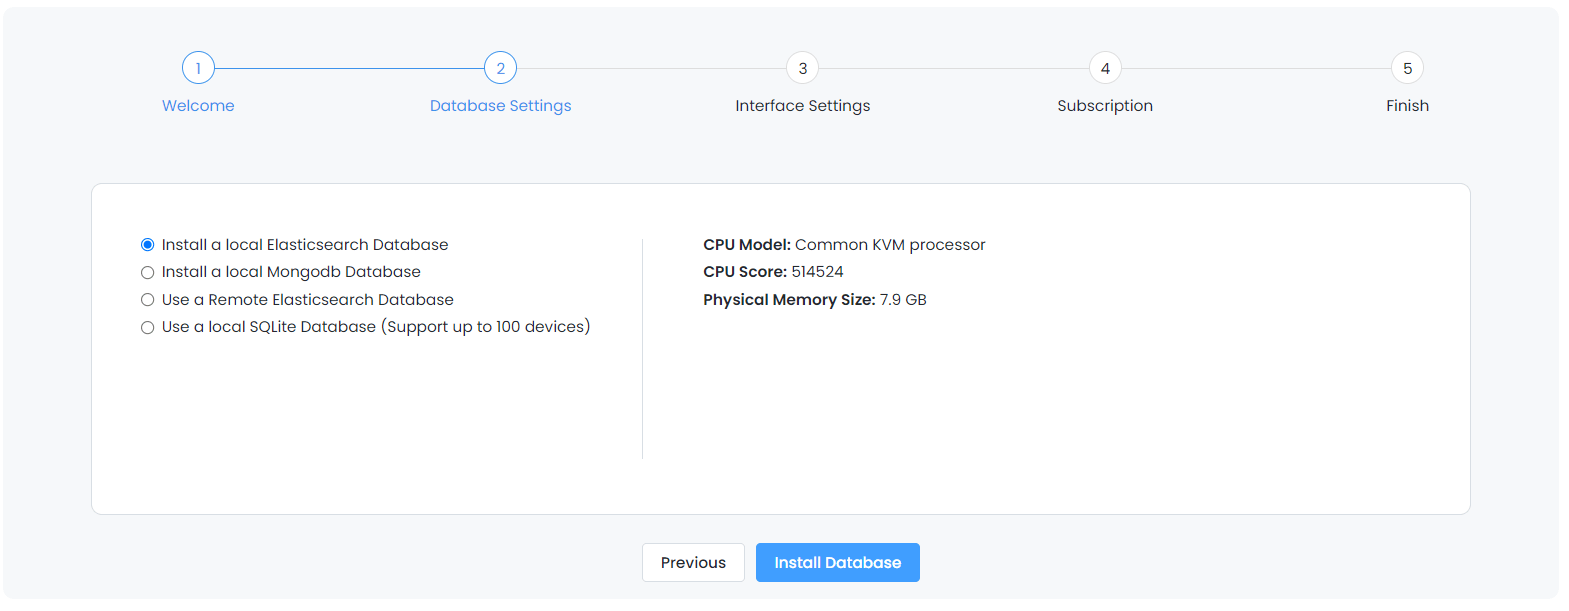
Figure 6. High-end reporting database
Figure 7. Low-end reporting database
If you select Use a Remote Elasticsearch Database, you will be prompted to enter the URL, username, and password.
Remote Elasticsearch database support is compatible with version 8.9.x to 8.17.1 of Elasticsearch.
Zenarmor requires unrestricted full access to the Database.
If you have SOHO or higher Zenarmor paid subscription, we recommend that you install your license key before proceeding with the initial configuration wizard since this will activate a feature that will enable you to have central reporting for many firewalls from a single Elasticsearch instance. Otherwise, only a single remote ES instance can be used with a single firewall.
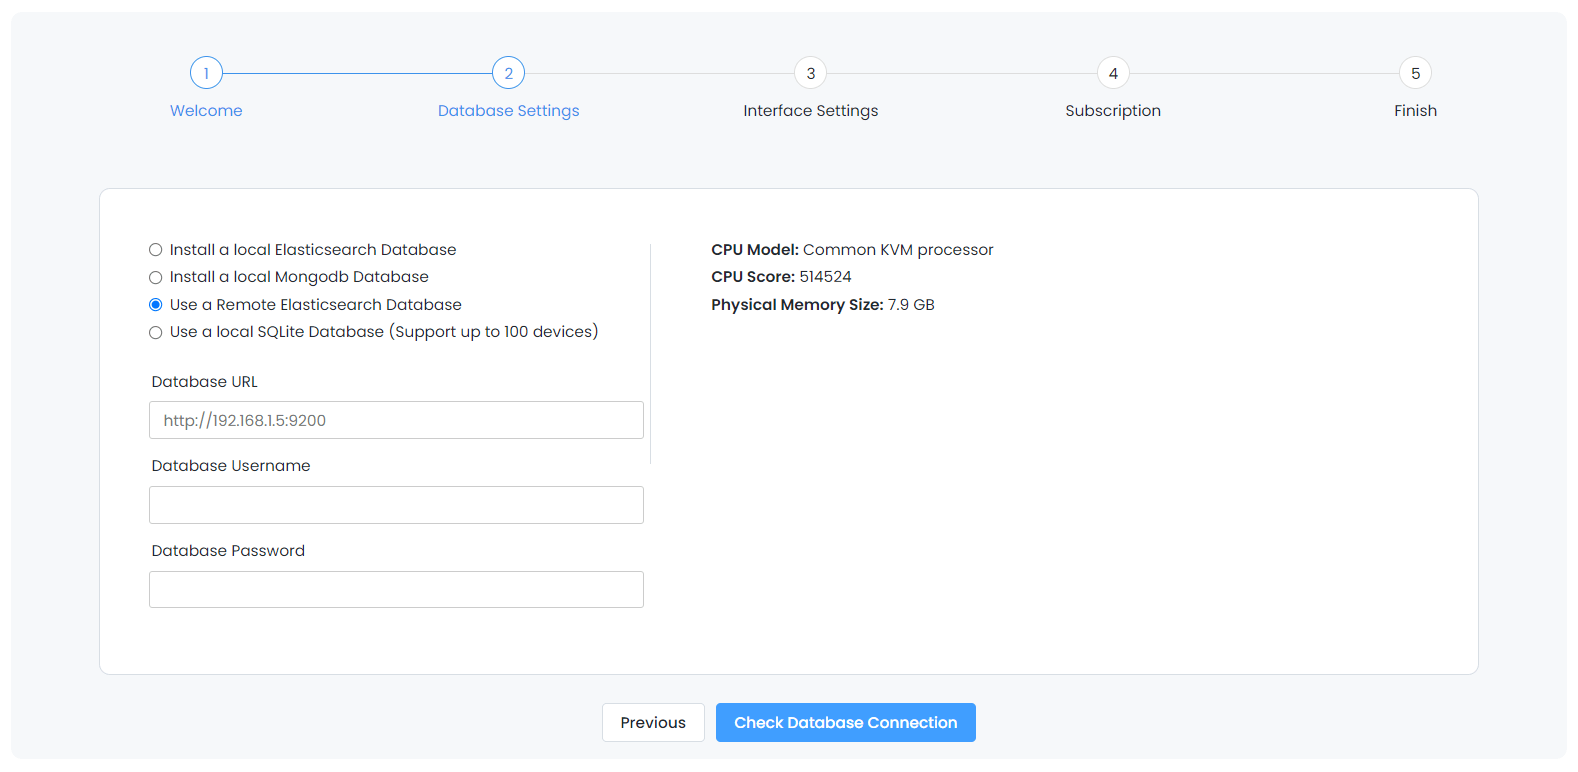
Figure 8. Remote Elasticsearch reporting database
-
Click the Install Database button to install the local database if one is chosen and to continue to the Interface Selection section.
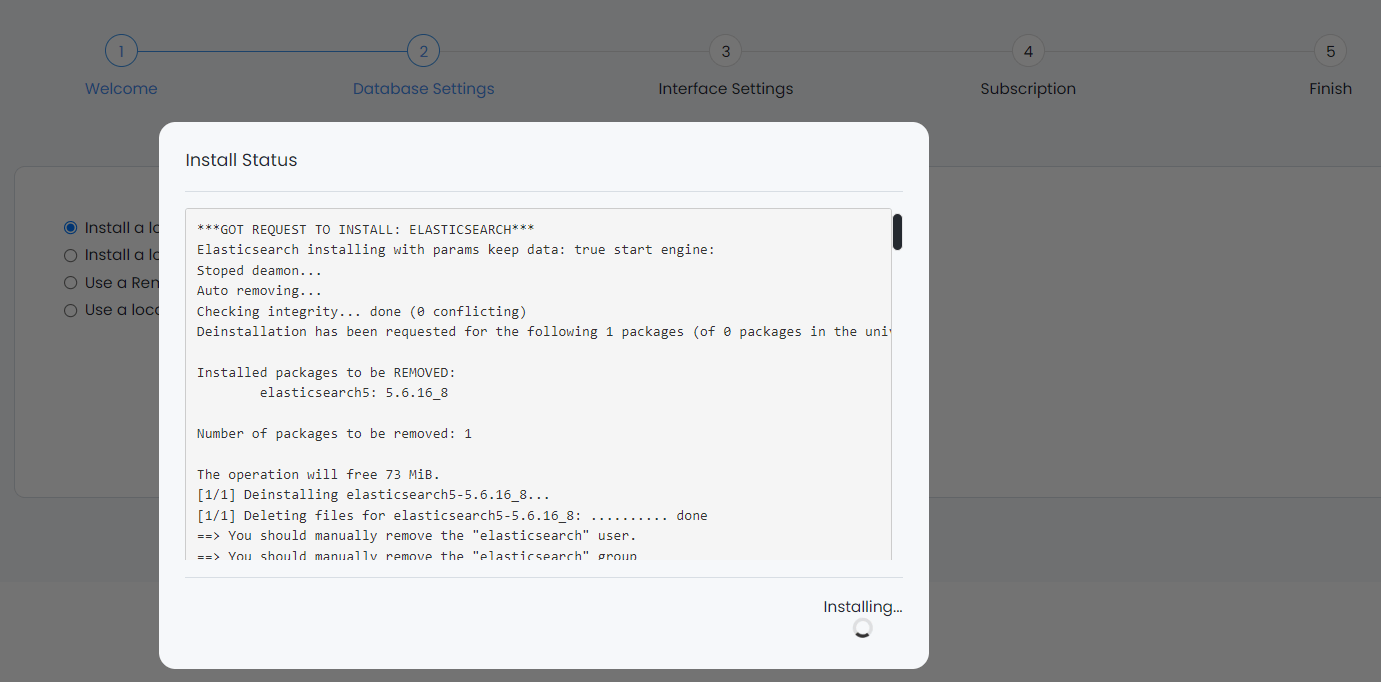
Figure 9. Installing Local Elasticsearch Database
-
Click the Next button to proceed with interface selection.
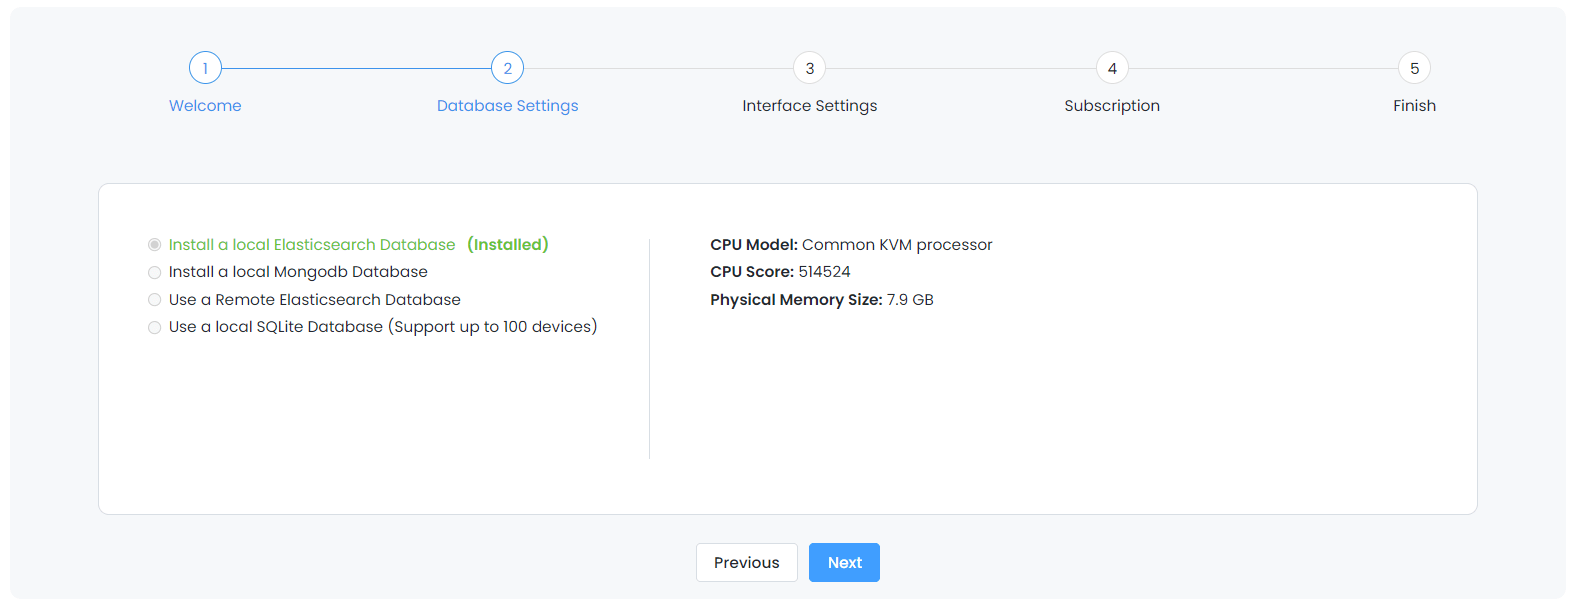
Figure 10. Installing Database Completed
3. Deployment Mode & Interface Selection
You may follow the instructions for Zenarmor deployment mode and interface selection:
-
Select the deployment mode depending on your topology and requirements. By default, Routed mode with emulated netmap driver option is selected on OPNsense. You may find detailed information on Deployment Modes Guide.
PrerequisiteBefore selecting netmap driver deployment options, make sure that the hardware offloadings are disabled on your node. Since Hardware Offloading feature is incompatible with
netmap.
Figure 11. Selecting deployment mode
-
You may check the CPU Pinning option. Zenarmor has a setting to make CPU pinning optional, giving you more flexibility in how you configure your system for optimal performance. By default, Zenarmor is pinned to a dedicated core in order to prevent CPU context-switching overhead. Because if the process wanders between CPU processors, CPU cache misses occur, which has a negative impact on performance.
You may disable this setting depending on your requirements by clicking on the Do not pin engine packet processors to dedicated CPU cores option.
-
Select the Ethernet Interface(s) that you want to be protected by Zenarmor.
Best PracticeAs a best practice, it is advised to select physical parent interface, such as
igb0, instead of VLAN interfaces for protection. This will enable Zenarmor to inspect all subinterfaces of the physical interface including the VLAN interfaces.Beware that if you select both VLAN interfaces and their parent interfaces, this will result in unnecessary duplications of effort in packet processing and reporting.
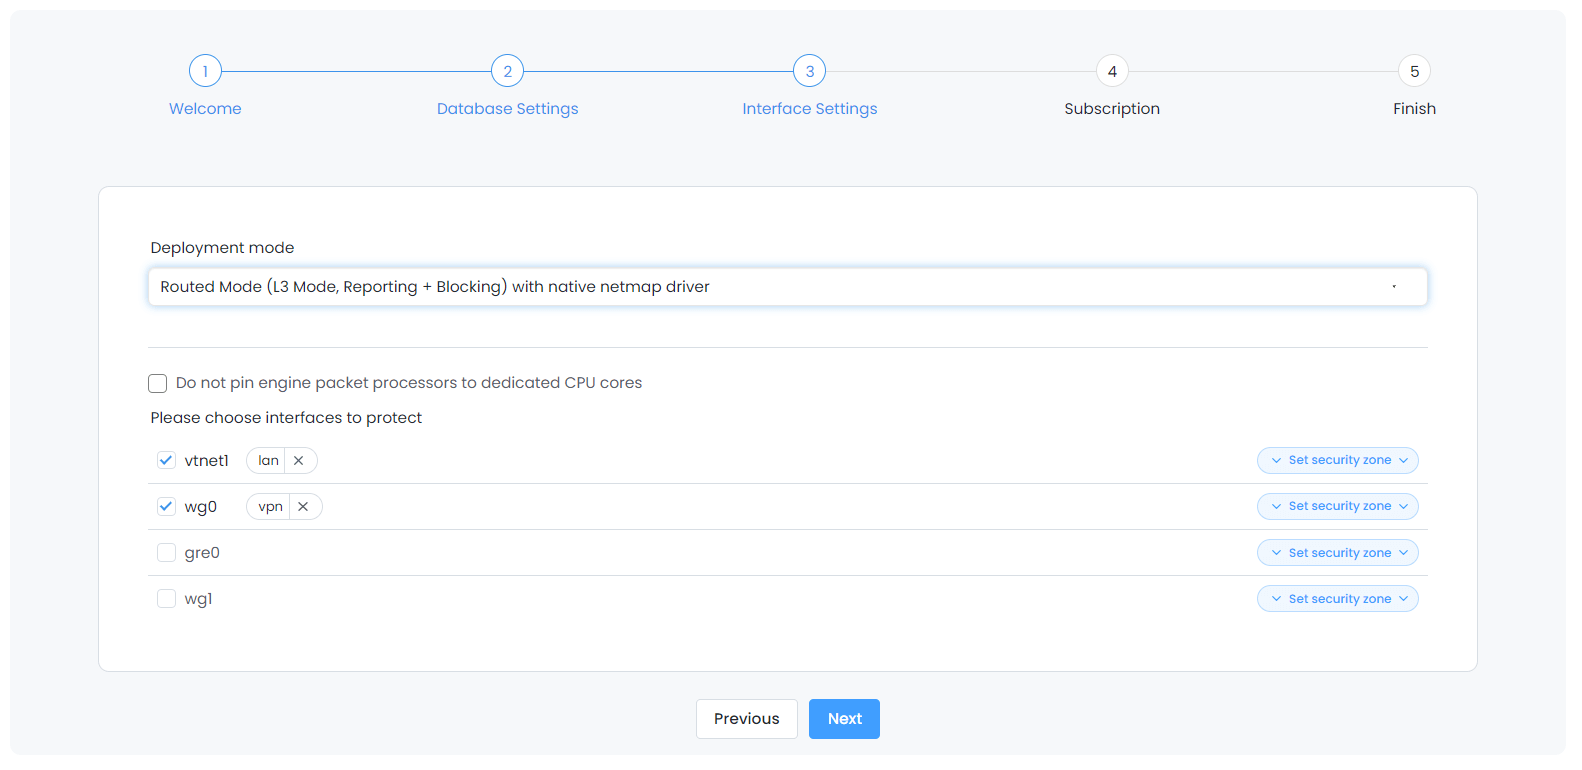
Figure 12. Protected Interface(s) Selection
-
Click Set Security Zone drop-down menu to assign a tag for the interface. You may set a custom security zone name or select one of the options available, such as
dmz,lan,guest,wifiorwan.
Figure 13. Setting Security Zone
To add a custom security zone tag, click Custom button in the Set Security Zone drop-down menu. After typing the new security zone name, such as
vpn, click Add button.
Figure 14. Setting Custom Security Zone
To delete the security zone tag from an interface, click
Xicon next to the security zone tag that you want to remove. This will pop up a dialog box for removal confirmation. Click Remove button to delete the tag.
Figure 15. Deleting Security Zone Tag
cautionEnsure that the security zone tags are properly specified for each protected interface. Misconfiguring the interface tag might lead to issues with filtering and reporting. For instance, if you designate the
LANtag to your WAN interface, public IP addresses on the Internet that your internal clients connect to will be seen as local devices. This might result in the devices identification function producing results that lack significance. -
Click Next to continue to Activate Subscription.
4. Activate Subscription
Installation wizard offers you the following options in this step:
- Start 15-day Free Trial of Business Subscription
- Activate your current subscription key
- Continue with Free Edition
If you wish to try 15-day Free Business Edition, select Get me 15-day Free Trial of Business Subscription option and type your e-mail address to claim your subscription key.
Everyone who installs Zenarmor and login into their Zenconsole may take advantage of a 15-Day Free Trial of Zenarmor Business Edition without entering credit card information.
If you have a subscription, select I already have my subscription key option to activate your subscription key.
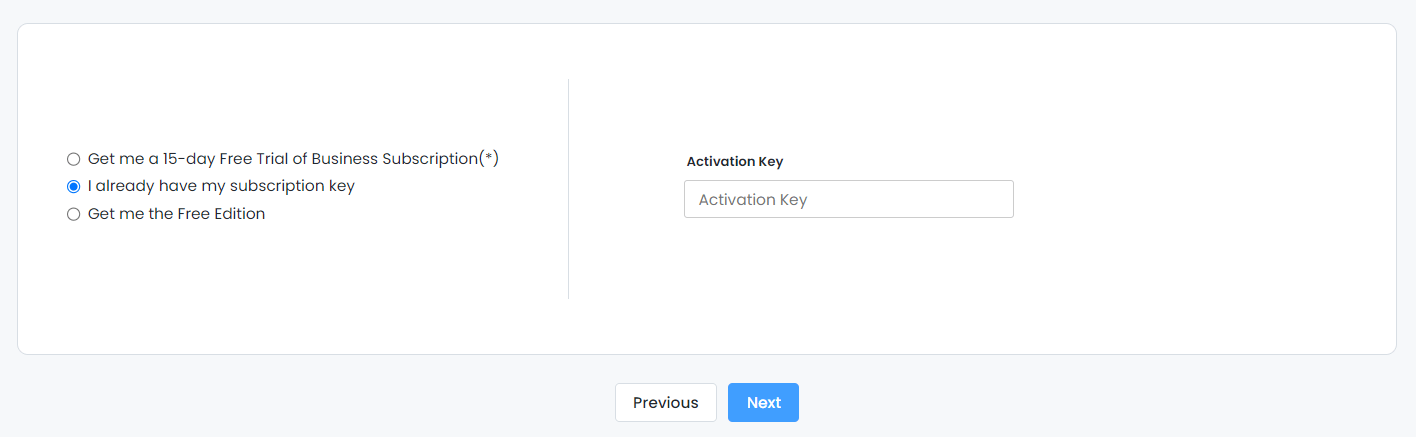
Figure 16. Activate Subscription
You may also use Free Edition by selecting the Get me the Free Edition option. You may enter your email address if you wish to subscribe to the Sunny Valley email list to stay up to date on the latest news.
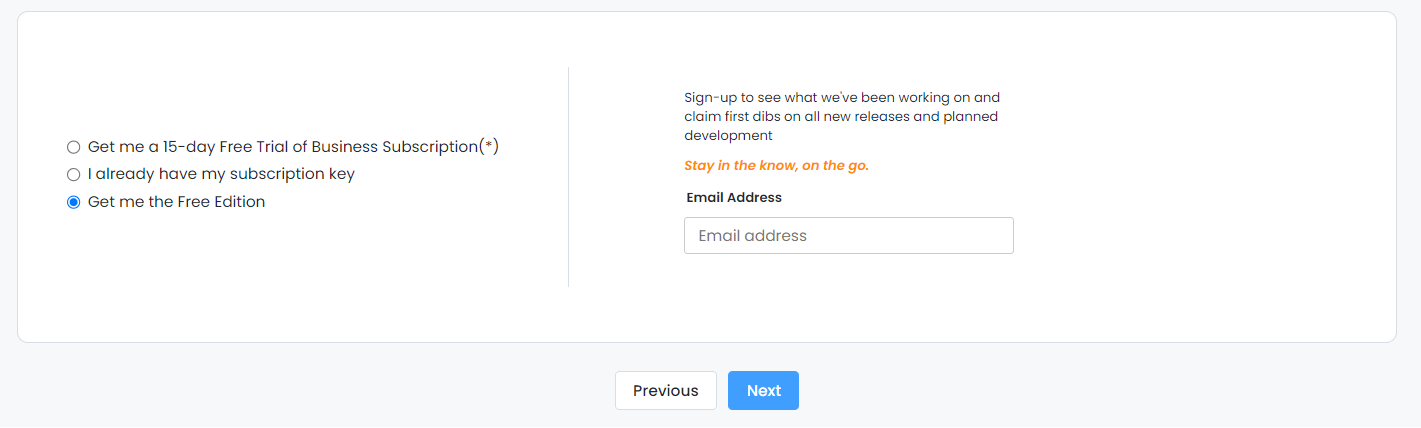
Figure 17. Starting Zenarmor Free Edition
Click Next to proceed to the Finish section.
5. Finish
Click the Complete button to save your initial configuration data and start using Zenarmor.
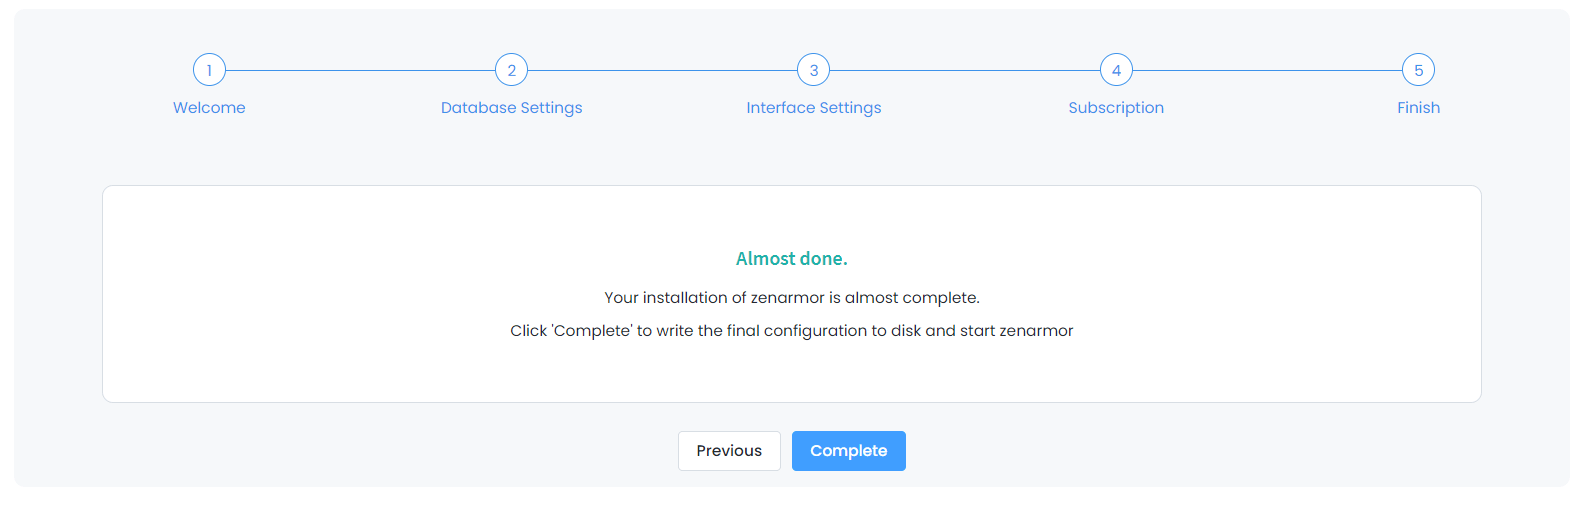
Figure 18. Finish
We advise you to read the Best Practices for Zenarmor Deployment Guide before configuring Zenarmor policies on your network.
Hands-on Video
Here is a video that will guide you through the steps of the Zenarmor® installation and initial configuration process on OPNsense: